My latest project is actually a prototype - I'm trying something I've wanted to do for a while now: a butterfly straitjacket with an attached hood. This project is also a good excuse to try another design feature a client has requested recently: removable crotch straps. Eventually this feature may end up in the finished client design, but first I want to test it out to even see if it will work.
The leather is a really soft beautiful cobalt blue from Tandy. I usually don't buy leather from Tandy because their pricing isn't the best, and I don't like a lot of the leather they carry. But this stuff was just beautiful. And on sale for $5 per square foot.
I measured it to be about 1.5mm thick. It has a great combination of thickness and softness - something important when making a jacket and hood out of the same hide.
I'm using my recently developed pattern for a zip-closure hood. I tweaked the pattern a little from the previous version to make it fit just a little more snug. You can just make out the old pattern (in silver) in the photo below.
For the butterfly straitjacket, I'm using the same pattern as the one below, but I plan to modify it slightly - adding length to the body so the straps don't have so far to go.
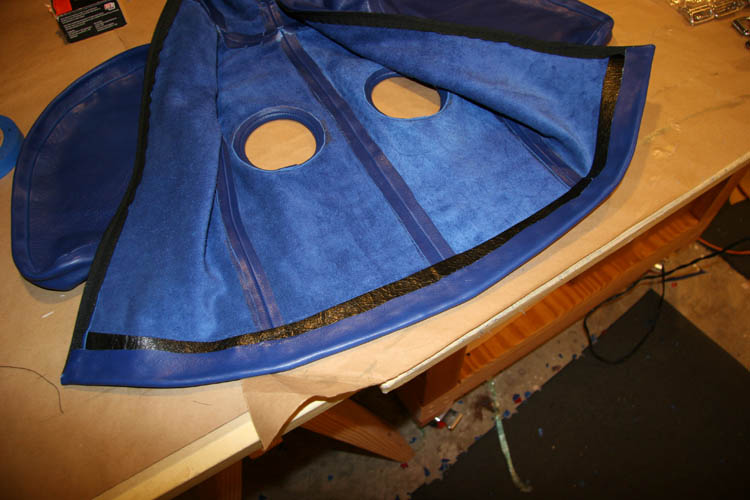
I'll start by tracing the old pattern onto butcher paper, and working from there. I make a tweak to the neck opening so it matches the seam where the hood meets the body.
The bottom hem is extended about 3 and a half inches.
Once all the adjustments are made, the parts are laid out on the leather. This is going to be a squeeze to get everything out of a 20 square foot hide. There's no room to spare...
I won't go into every detail of construction, as I've covered the making of butterfly straitjackets elsewhere on this blog. But you get the idea:
Clip, sew, glue & flatten the seams.
It's still weird to cut the breast openings out of the piece. It seems so wrong to cut a hole in the leather! But it's the price you pay for breast access. Trust me, it'll be worth it in the end...
Another weird thing is sewing on the rolled edge around the opening.
You pretty much have to freehand feed the edging as you turn the workpiece under the needle. It is scary, but take your time and it comes out just fine. Just go slow. Do a few stitches at a time.
Left side done...
...and the right.
Trim the excess length on the rolled edge. (This is one case where it's better to go long and trim to size than to not have enough and come up short!)
Glue around the inside and outside of the openings.
When you fold the edge back initially, it will look like this:
But then you cut relief notches so the edge can lay flat.
Pull and re-stick the edge, flattening it and shaping the rolled edge as you go. Left one complete:
And now the right one:
Once they look good from the front, you can topstitch around the opening and carefully trim away the excess in the back.
Be careful here, as you can easily accidentally cut through to the front side.
The hood gets the usual "hood-forming" treatment. Did I mention how soft this leather is?
Ready to sew with the front clipped to the rear panels.
Glue that seam up, and flatten 'er down.
So pretty...
We've got all our sub-assembly done, now it's time to put it all together.
Arms first.
I work with the body inside out. It helps to keep track of the pocket by marking the side you want to face the front of the jacket. As soon as you turn things inside-out it can get confusing. I also try to follow the line on the body when sewing, as that is most important.
If you try to follow the line inside the arm pocket, it may not match up with the body perfectly, and that would not be a good thing.
Now for the hood. Clip in place, aligning on the centerline.
Lately, I've been stitching just an inch or so on either side of the center seam - making sure they are aligned perfectly.
When sewing the two curved shapes together (the hood edge with the body opening at the neck), it was very easy for the pieces to slide and for the center seam to slip out of alignment. Whey you just focus on that critical inch or two around the seam, it's easier to get it aligned just right.
That's about it for part one.
See you next time...