I've been working lately on refining a favorite old pattern for a classic laced armbinder. I really love the way this armbinder fits, and was hoping to verify and update the original pattern that I made back in 2002.
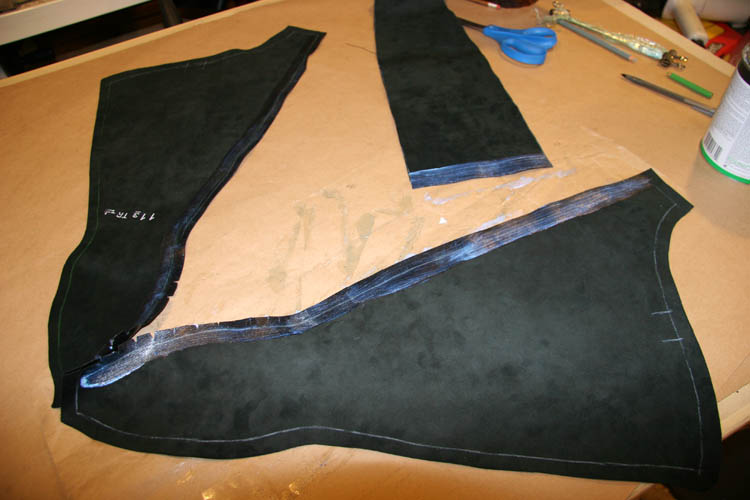
The first thing I did was scan the old pattern on a flatbed, then used Adobe Illustrator to make a new clean vector-line version. Once I have a digital version, it is easier to make variations and size edits from that original digital file. The two side panels and the tongue are placed and traced onto the leather hide. I'm using a soft, shiny deer hide that should make a really sexy piece. It's a bit thicker and stronger than lamb, but has a softer feel and more stretch than most cow hides.
The marks at the end of the hand pocket indicate where the stitching should stop for the rear lacing opening.
These other double-marks at the top of the main panels indicate the proper placement of the shoulder straps.
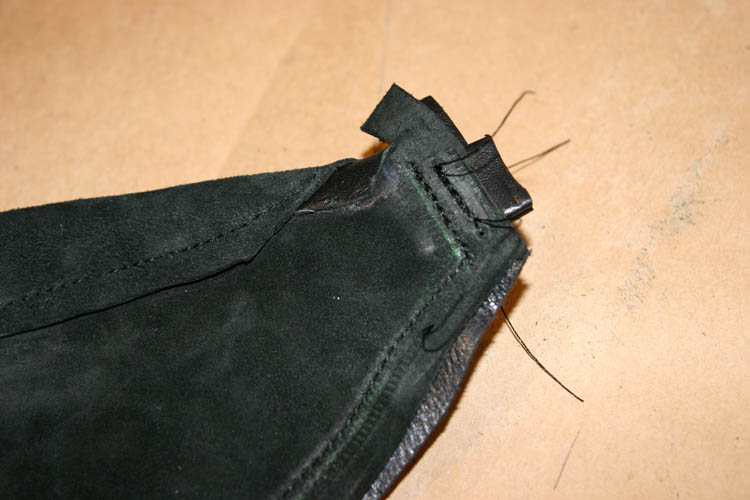
The two main panels are clipped together, and the first bit of stitching is done:
The stitching is just in the tiny space between the rear opening and the D-ring location at the end of the hand pocket.
It's almost time for the first glue operation, but first I skive the top of the tongue panel:
Now it's time to glue up the top of the tongue panel, and along the rear opening.
Once the glue sets up, those seams get folded over and pounded down with a mallet.
They should look something like this:
A closeup of the inside of the hand pocket:
Now it's time to sew in the tongue. This is one area that I see a lot of armbinders fall short. They either have no tongue at all or it's a small or partial tongue, so you can see through the laces and to the arms inside. I think it looks neater (and sexier) to have a full rear tongue, so no matter how open the rear is you won't see the arms inside...
Lately I've been using double-faced tape to hold parts like these in place for sewing.
I run a line of tape along the outer edge of the tongue, remove the backing, and carefully place the tongue in position on the side panels, centering on the hand pocket centerline.
Although it's thin, the tape holds everything in place pretty securely - which is important as you don't want things shifting around as you are feeding it through the sewing machine.
I'm using a bit of touch to make sure the tongue is positioned correctly from the topside. I want to make sure the tongue extends beyond the 5/8" seam allowance I need between the sewn edge and the folded edge of the opening. If it's too close, I won't have room to set the grommets.
Once I'm happy with the placement, I topstitch the tongue in place.
Here's a look at the backside. I got pretty close along the bottom edge there, which leads me to the first edit to the pattern: I'll make the bottom of the tongue a bit more rounded so I won't cut it so close next time. Overall, the shape is pretty good.
Now that the tape holding the tongue has done it's job, you can carefully remove it. I can be a pain to get it off because it really wants to stick to the suede side of the leather, especially where the presser-foot has fed it through the sewing machine. But if you work at it enough, it will come off.
With all the tape removed, I trim off the extra leather from the tongue.
This leaves you about an eighth of an inch or so...
Next up: the D-ring strap. I cut a strip of leather slightly wider that 1.5 inches.
Skive it slightly along the edges.
I use spray-mount to adhere a piece of nylon reinforcement ribbon inside the leather strap.
Glue the ribbon in place...
...and fold the edges over.
Flatten it with a mallet:
This inner band gives the strap a lot more strength and keeps the leather from stretching. That's a 3/4-inch D-ring.
The D-ring gets tucked inside the hand pocket.
Now we clip the armbinder closed and sew it shut along the rear seam.
I'll usually run a couple of rows of stitching to reinforce the D-ring connection.
Each of these rows has been backstitched as well. Leather can be very strong, but because the strap is only 3/4-inch you want to give it all the help you can. In this case, more stitching is better.
Now we clip darts in the seam allowance to allow the fold-over to lay flat.
Run some glue along the edge...
...and fold her flat.
Looking good...
Next up: some reinforcement tabs. I make these from the stiffest scrap I can find...
Two for the strap connection...
...and one for the rear center seam:
Here they are glued in place:
Time to make straps. These get cut out of the same hide. I want a one-inch strap, so the strip I cut is a little over 2 inches wide.
These guys get glued up...
...and folded over.
One-inch straps are about the smallest width I would use on a project like this. Any smaller, and they may not have enough surface area at the connection point to take the strain.
I didn't take a picture of this part, but somewhere before now you need to turn the armbinder right-side out, and glue down the top edge seam.
OK, now we're ready to make some buckles. I cut two 8-inch sections from the straps made earlier.
I also cut down the remaining straps to 29 inches in length.
The buckle slot position is marked with a template and cut with an oblong punch.
I also cut some 1-inch strips to make belt keeper loops for the straps.
These are a few inches in length.
They get glued up...
...and folded over...
...and end up being about 1/2-inch wide.
Pounded flat:
Trimmed to size: (I use a doubled-up strap to wrap them around, then mark them and cut 'em to length.)
I use a staple-gun to hold the keeper loop closed.
It gets stapled first into a wedge of wood.
Then I gently pry it out and fold the staple prongs down.
I love making matching keepers - all elements from the same hide.
I slide these onto the buckle straps:
Ready for riveting...
Now I use a template to mark holes in the main panels where the buckle straps will attach.
I use the template to mark and make holes in the buckle straps themselves. It helps when you are going through 3 layers like this to have pilot holes for the rivets. Otherwise, there is a tendency for things to skew as the rivet goes through.
It's the same idea for the long straps. I use the template to mark the body and the strap, and make pilot holes in each.
Then the parts are lined up and riveted in place.
Now I use the patten to mark the position of the holes for the lacing grommets.
Holes punched...
And grommets set:
I used Osborne #00 black grommets.
Final step: lace her up...
This armbinder came out so pretty... I just love the leather. So soft, and beautiful.
Time for some real-world testing, I think.
Looking forward to it...
Until next time... thanks for stopping by!


At the start of this post: Sweet, I have to try this!
ReplyDeleteAt the end of the post: I should try something easier first.
Do you think this design and/or your hood patterns that you've posted work work in denim, or stretch denim?
Dear Apullin,
DeleteI think this is actually not a bad project to try - it is not too complicated, and doesn't use too much leather. It would work in denim as well, although I always say you should prototype a fit test in a cheaper material first. Even different weight leathers may require an adjustment to the pattern. The toughest part if you are starting out is the connection of the straps to the body. Once I'm happy with the pattern I hope to post a downloadable version.
Hello and thank you very much for this great and detailed how-to! I am always fascinated reading your blog. There are so many details to make even "standard" gear better and better.
ReplyDeleteSadly, I never owned a quality armbinder and would love to build one. (Probably, it would not turn out as a "quality" armbinder in my case, thoug...) I always fail even et the very beginning: I start with a duct tape prototype. unfortunately, it is always too tight and causes tingling in the fingertips. I would have guessed that armbinders - at least custom fit ones - should avoid this problem because the pressure is spread over a large area.
How do you design your patterns? I guess that you cannot even take direct measurements from all your customers, right? So it must be even more difficult for you to get a really tight fit and avoid nerve/circulation issues at the same time. Could you please give me some advice on how to develop a good pattern?
Greetings and many thanks for all the great instructions you give to us,
Olobar
Dear Olobar,
DeleteYou're welcome, and thanks for the message. I love sharing the little details, as they're often hidden or hard to see on the finished piece. But they can make a big difference in the quality.
I do usually start with a duct tape pattern. But if you are having problems with tingling, it could be it's too tight, or I've noticed just having the arms pulled against the ribs can start to limit the blood supply pretty quickly. Even with a custom-fit, you get to choose your level of severity which can affect the time you are able to wear this kind of restraint.
My process is usually wrap first, then generate a pattern, use that to make a prototype, and use the prototype feedback to refine the pattern. Repeat until happy. It can take a few rounds, but editing and refining until it's just right is part of the fun for me.
Thanks again for the comment, it's always good to hear if anyone is getting something from the blog.
-Christopher
Fantastic work Sir. I seem to always fall a little short when making the pattern. Could you share some pattern measurements with me? Such as total length, length to hand pocket, width at the top and wrist, widest width of hand pocket, grommet spacing and most importantly the tongue dimensions. Thank you for sharing your blog with us.
ReplyDeleteJoe
Dear Joe,
DeleteThanks for the comment. I"m still working on getting the pattern right before I post it - it's almost there, but not quite. The hand pocket in particular is not the way I want it.
Did the pattern ever get posted? Can't find it. Thanks!
DeleteNot yet... but check back next week. I should have it up by then.
Delete